- Developing a Custom Trade Show Booth
Design
-
- For my second custom display I am going
to play the fellow designer sitting in his cubicle who is handed
a project. I am asked to do it as a favor to the boss. He/She
has a friend who wants to display at OTC and they were able to
secure a 10'x30' island and had a limited budget left to build
a display. If business took off as they expected they would be
able to afford a more elaborate display next year.
-
- Excited by the prospects I immediately
realized that I have some real world challenges here in my home
office;
- I am working on a 32bit office computer
which I built almost 10 years ago.
- I am working with legacy software that
includes AutoCAD 2000 and Office 2003.
- I will never be able to achieve the kind
of example I want to present from my home office without access
to the material and stock library of a custom trade show company
- Not a problem. I a have built bigger projects
in less time. Except that a 32 bit computer simply does not have
the power to render quickly without tapping into the bank of
computers found in a moderate size office I should be fine. I
have one laptop that is older than this machine. I am going to
have to use what I have and make the best of it.
-
 If I worked in a production house I would have
access to a full library of RPC images and products all designed
to support custom trade show booth development. So, solution
one is that I use as many existing models as possible. I can
save some time and still be realistic about the layout. Solution
two is that I focus on a simple, but realistic display that fits
the bill of providing enough detail to show that I know what
I am talking about. In this kind of work we can be extravagant
with our designs but there will be that occasion when a new start-up
with a limited budget just wants to get into the door. If I worked in a production house I would have
access to a full library of RPC images and products all designed
to support custom trade show booth development. So, solution
one is that I use as many existing models as possible. I can
save some time and still be realistic about the layout. Solution
two is that I focus on a simple, but realistic display that fits
the bill of providing enough detail to show that I know what
I am talking about. In this kind of work we can be extravagant
with our designs but there will be that occasion when a new start-up
with a limited budget just wants to get into the door.
-
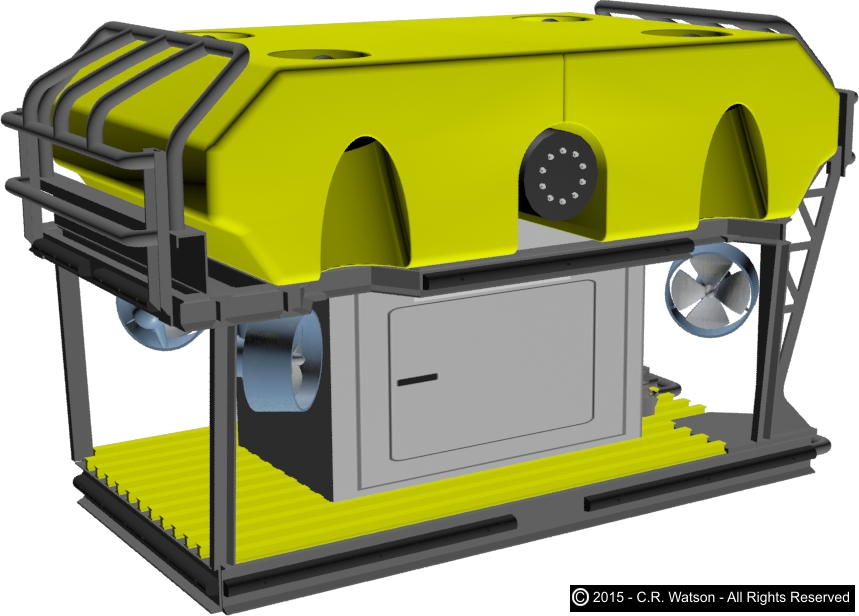
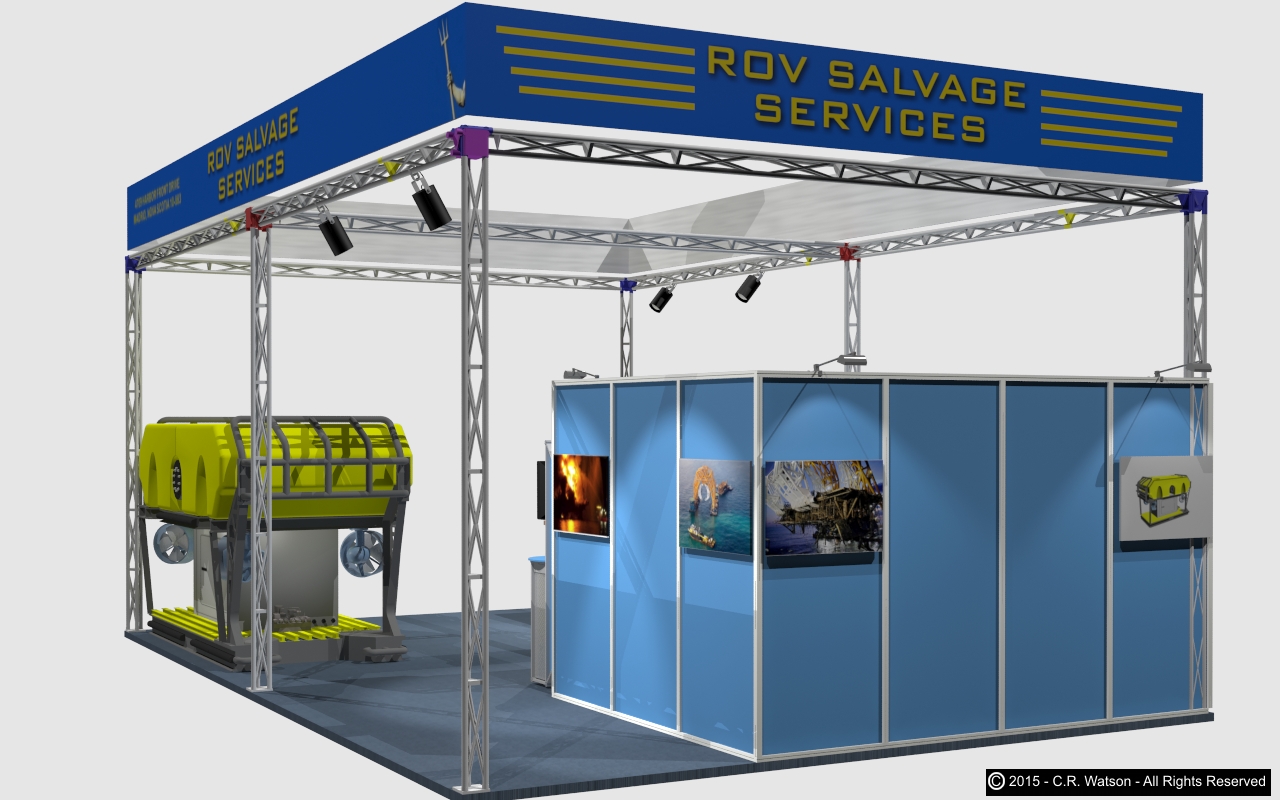
- A few years ago I developed some basic
models of a ROV for Perry Slingsby. With this model as a place
holder I can use the name "ROV SALVAGE" as if it were
a proper business name without running into copyright infringement
issues. On this model there are a lot of parts missing but it
is the correct size and sufficiently close to the real deal to
leave no doubt what it is and what my intentions are.
-
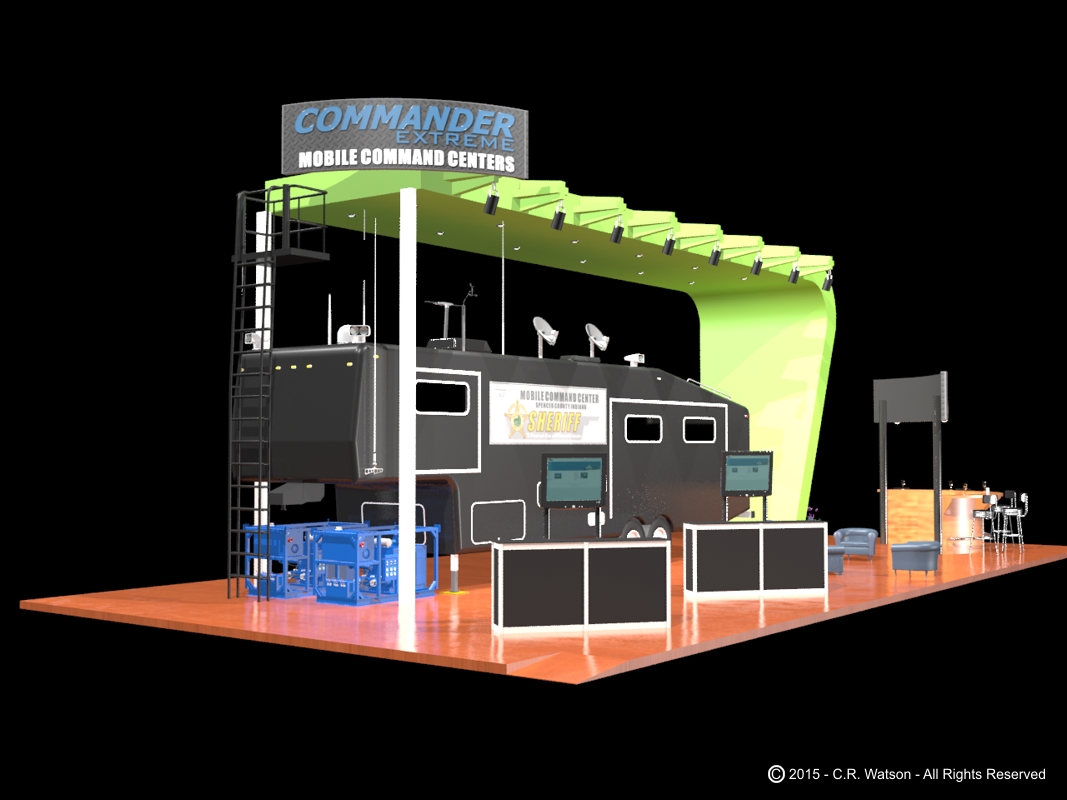
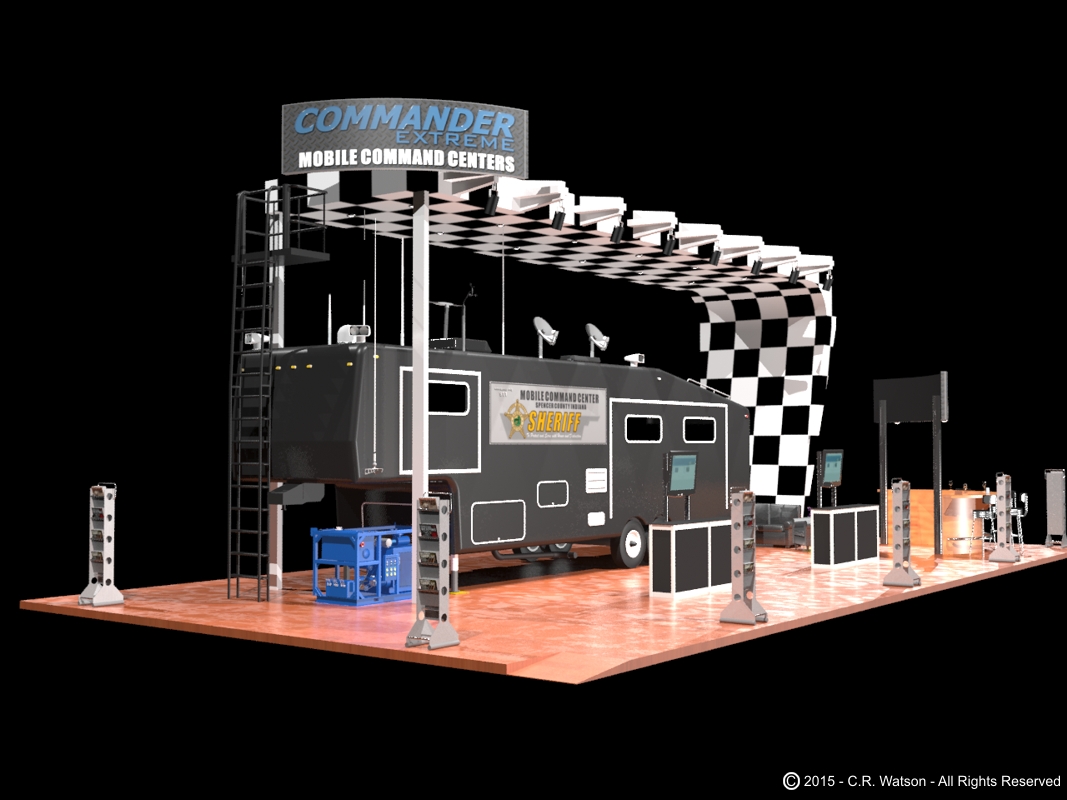
- Preliminary Assembly for Customers
Draft
-
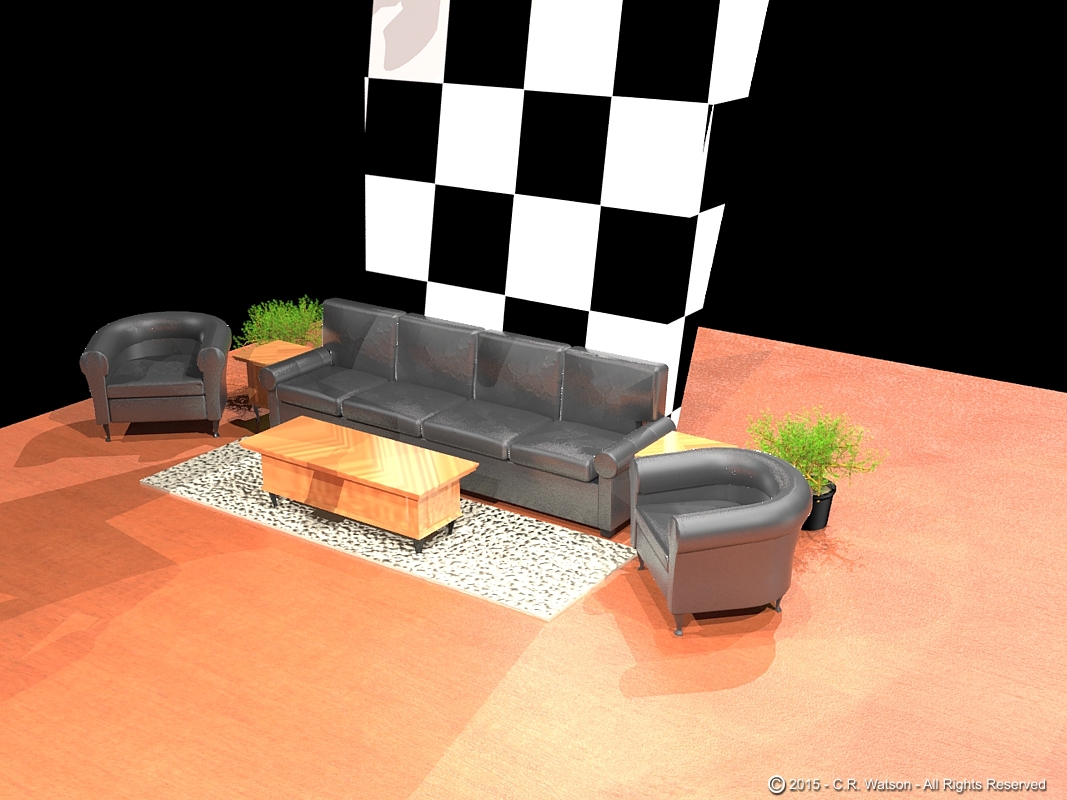
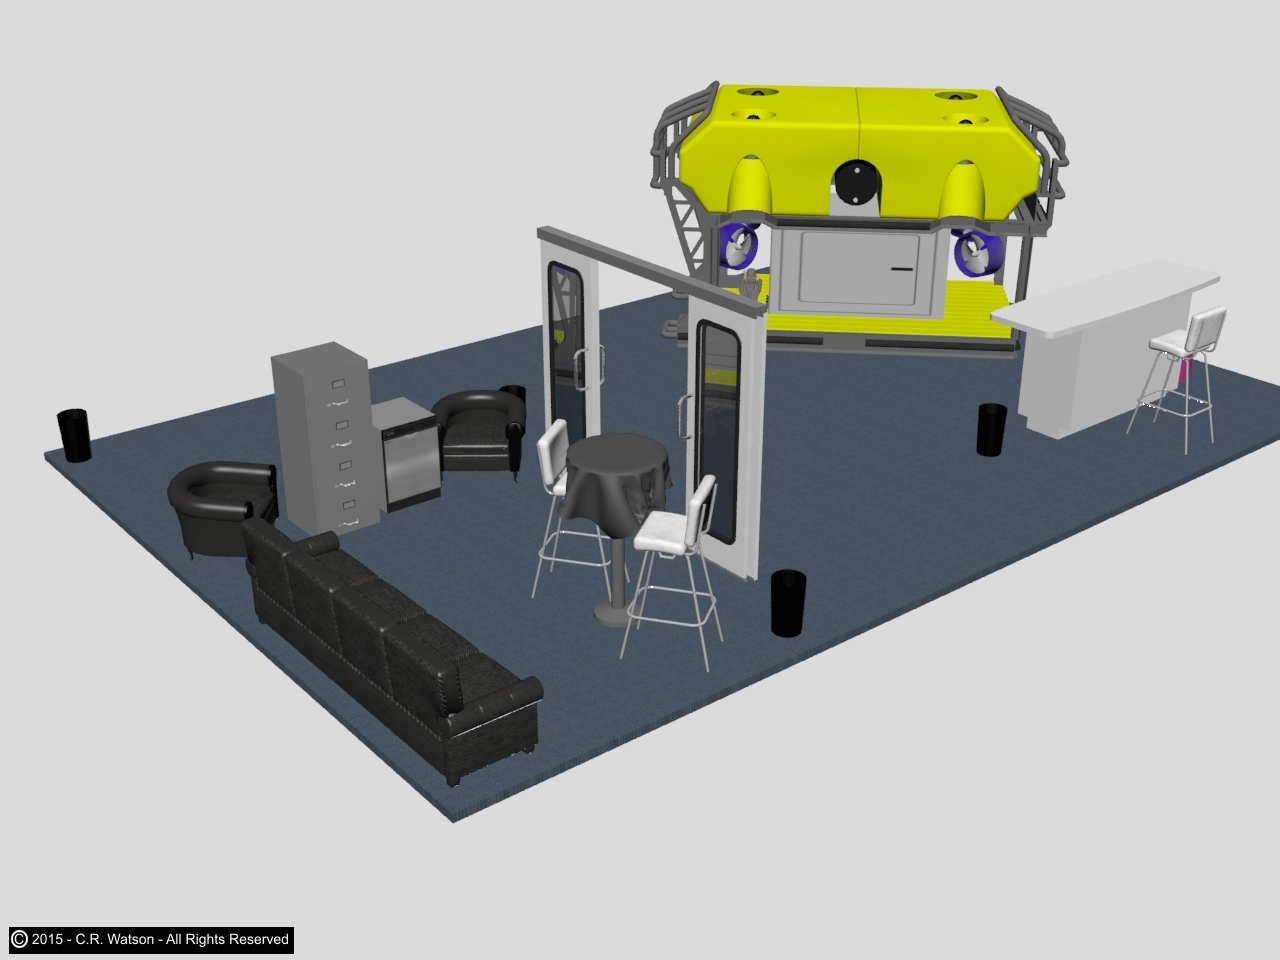
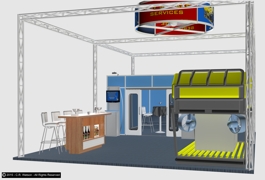
 One of the first things we would deal with is the
list of items wanted by the client. I took some of these from
an actual list given to one of the crew setting up next to us
in New Orleans. On their 10 x 30 island the client wants a closed
lounge setting for someone to lay down and rest. Because the
main attraction was a ROV for Salvage Operations I decided to
use an actual double sliding door from Freeman Marine. One of the first things we would deal with is the
list of items wanted by the client. I took some of these from
an actual list given to one of the crew setting up next to us
in New Orleans. On their 10 x 30 island the client wants a closed
lounge setting for someone to lay down and rest. Because the
main attraction was a ROV for Salvage Operations I decided to
use an actual double sliding door from Freeman Marine.
(Note: This door was built from Freemans
blueprints for a yacht I was working on.) The idea of a true
marine sliding door would give the client a sense of familiarity
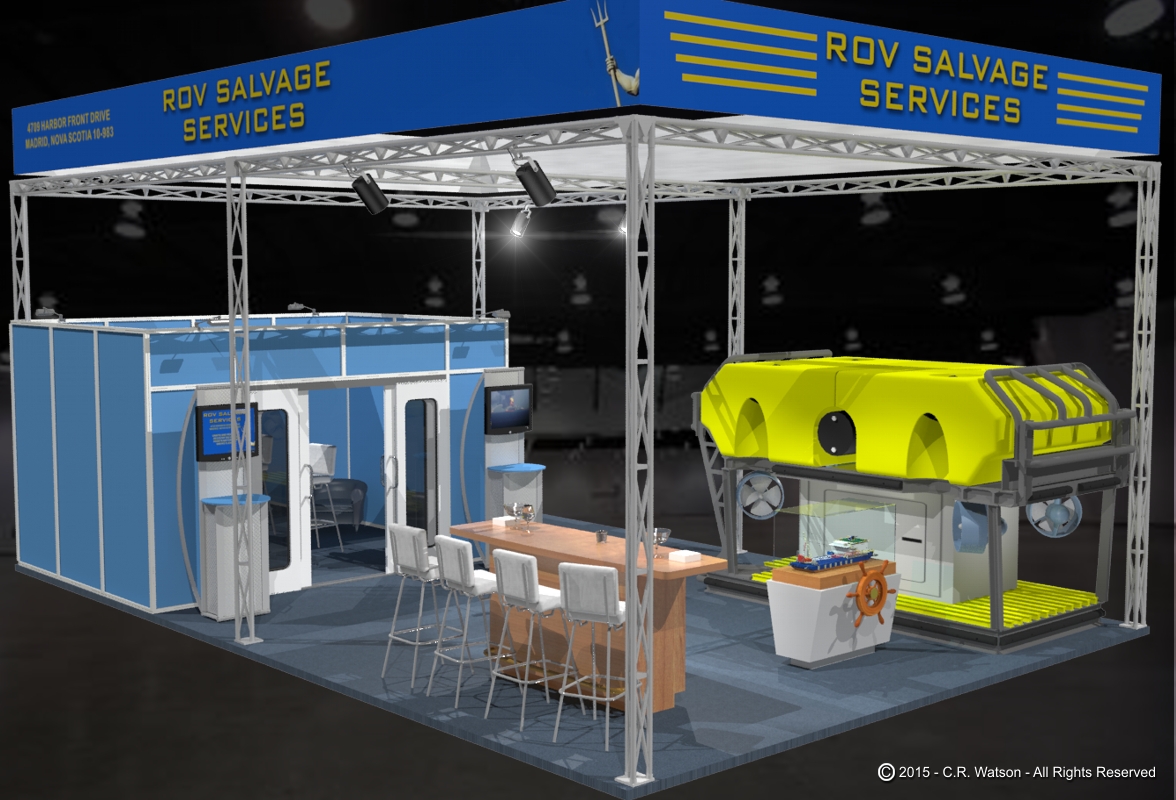
since the doors are from a ship. The bar is custom for 4 stools
with a standing bartender. A coffee nook of our own choosing
is to be set up adjacent to the lounge wall outside (if i have
time) for breakfast and drinks.
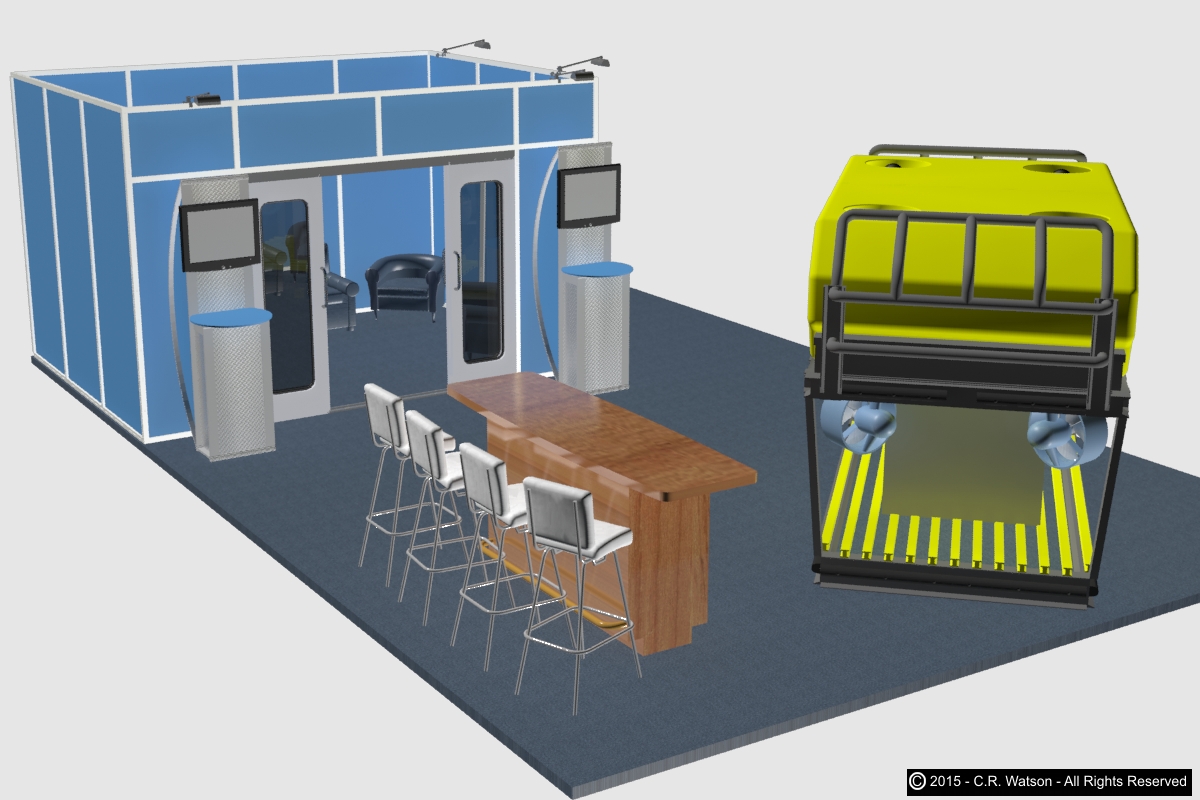
Construct Lounge Walls and Start Adding
Kiosks with Touch Plasma Screens
 Using Octanorm and Sentra we wall in the lounge.
The frame to fit the Freeman door is custom built in the shop
to tie into the Octanorm . The lower slide rail is also notched
into the floor stand so that there is no tripping hazard. Using Octanorm and Sentra we wall in the lounge.
The frame to fit the Freeman door is custom built in the shop
to tie into the Octanorm . The lower slide rail is also notched
into the floor stand so that there is no tripping hazard.
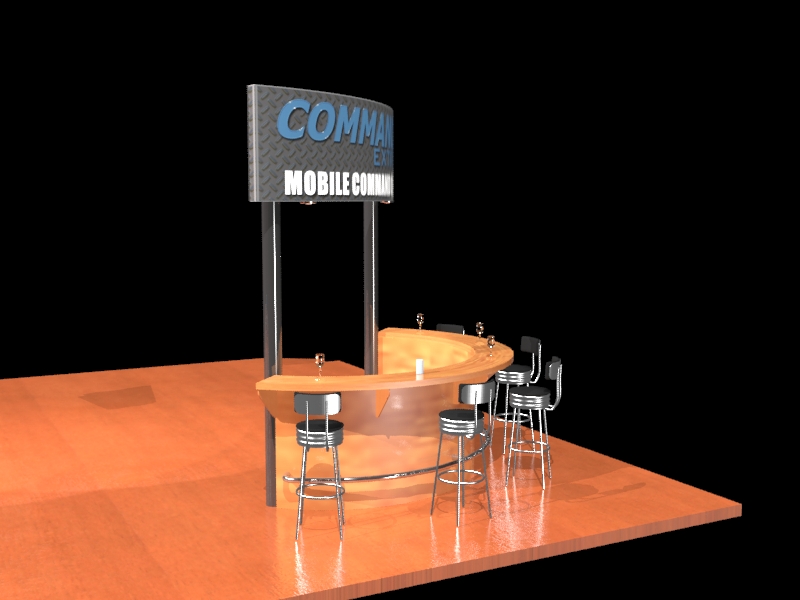
The two kiosks are brought from another
display and changes made. Color of the Sentra is changed from
red to blue, and the perf panels are traded for AL checker plate.
A custom bar and chair are added in based
on a picture from the client who saw one at another trade show
and wanted one just like it. The only concern I have is that
the chairs are in need of something to prevent them from being
pushed off the platform into the aisle. I might look at that
later.
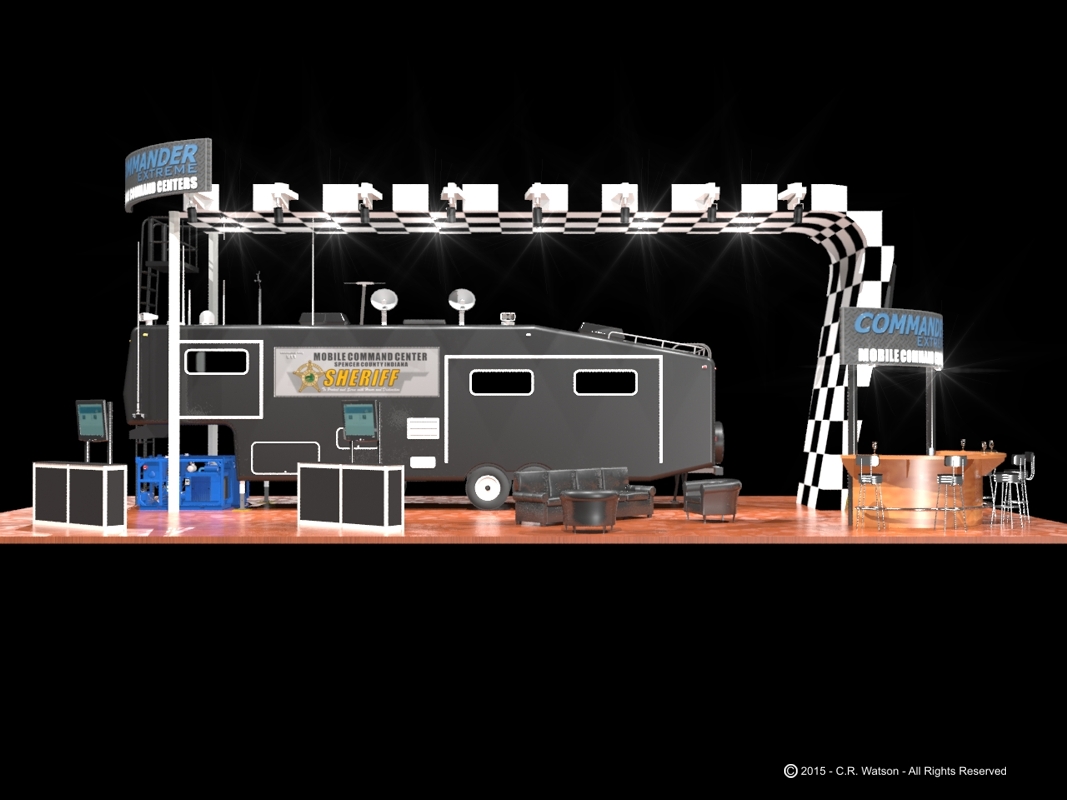
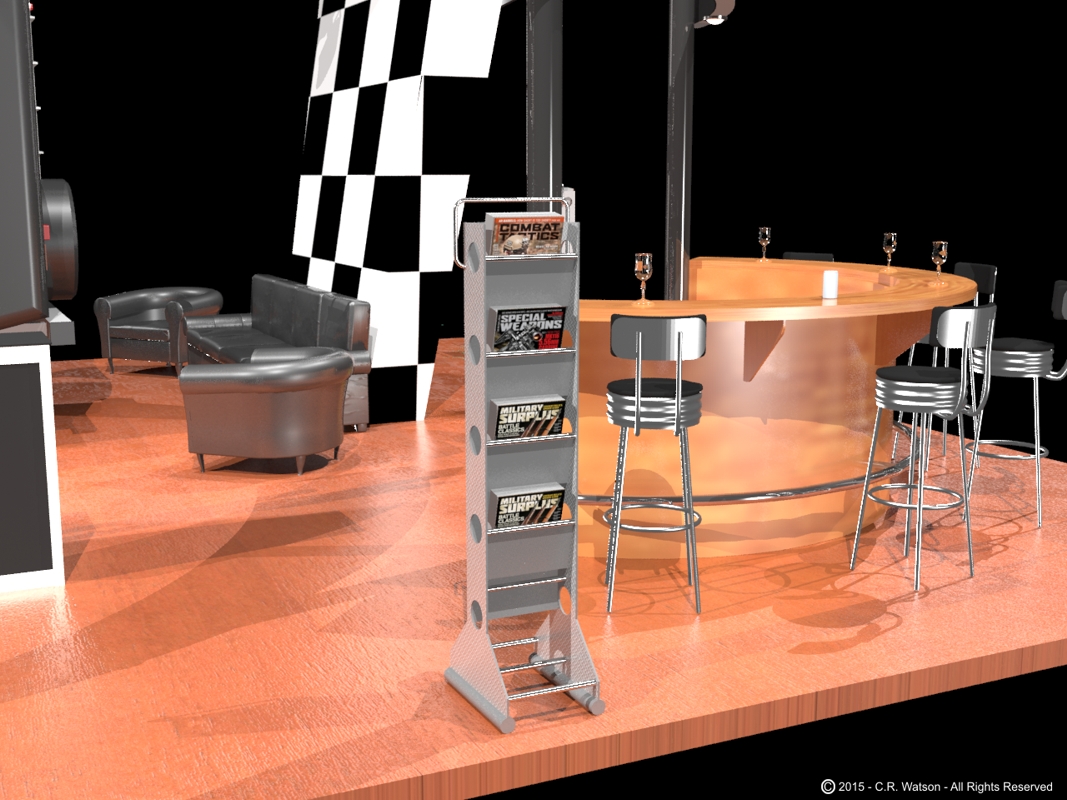
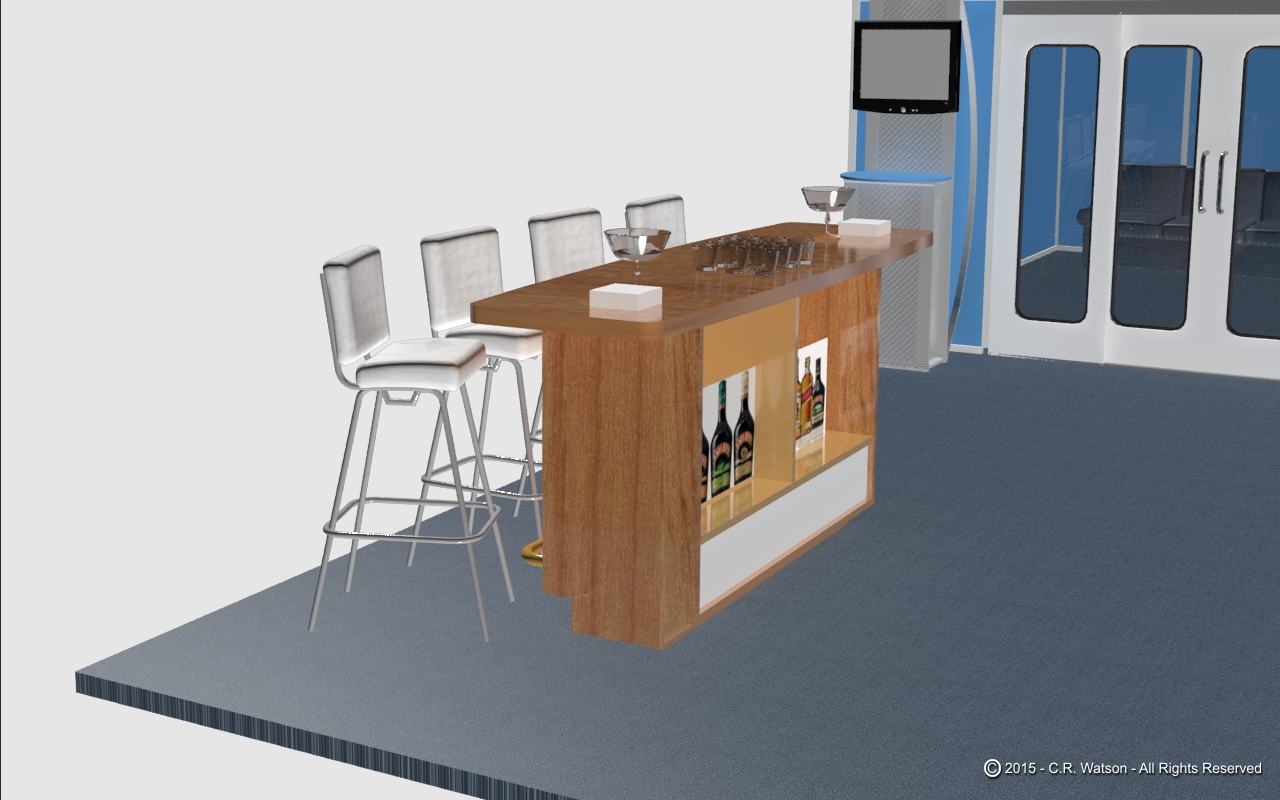
Adding Details To Test Appearance
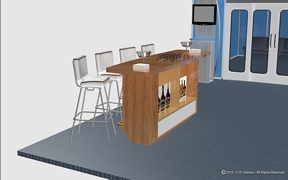 In order to speed up rendering we turn off certain
features and details but first we need to know what something
will look like to make sure the parameters are set correctly.
In this scene I made the wood grain with a varnished surface
and added napkins and glasses to the bar top. The varnish is
going to create a reflective surface as the glasses will create
reflective and refractive surfaces. The render time is going
to increase exponentionally as I add each unit. In order to speed up rendering we turn off certain
features and details but first we need to know what something
will look like to make sure the parameters are set correctly.
In this scene I made the wood grain with a varnished surface
and added napkins and glasses to the bar top. The varnish is
going to create a reflective surface as the glasses will create
reflective and refractive surfaces. The render time is going
to increase exponentionally as I add each unit.
Notice how the chairs are a bit askew.
That is because in my interview with the client he wanted to
see a bit of realism in our presentation.
Also note that the bottles beneath are
just a graphic on the shelves. I can make bottles but render
time is already intense with the glossy varnish and glass refraction
and for most circumstances the inside of that bar won't be visible..
Once I am certain the bar looks as I want I turned off the gloss
feature and removed all but a few glass items to speed up the
render time. I can always add those back later.
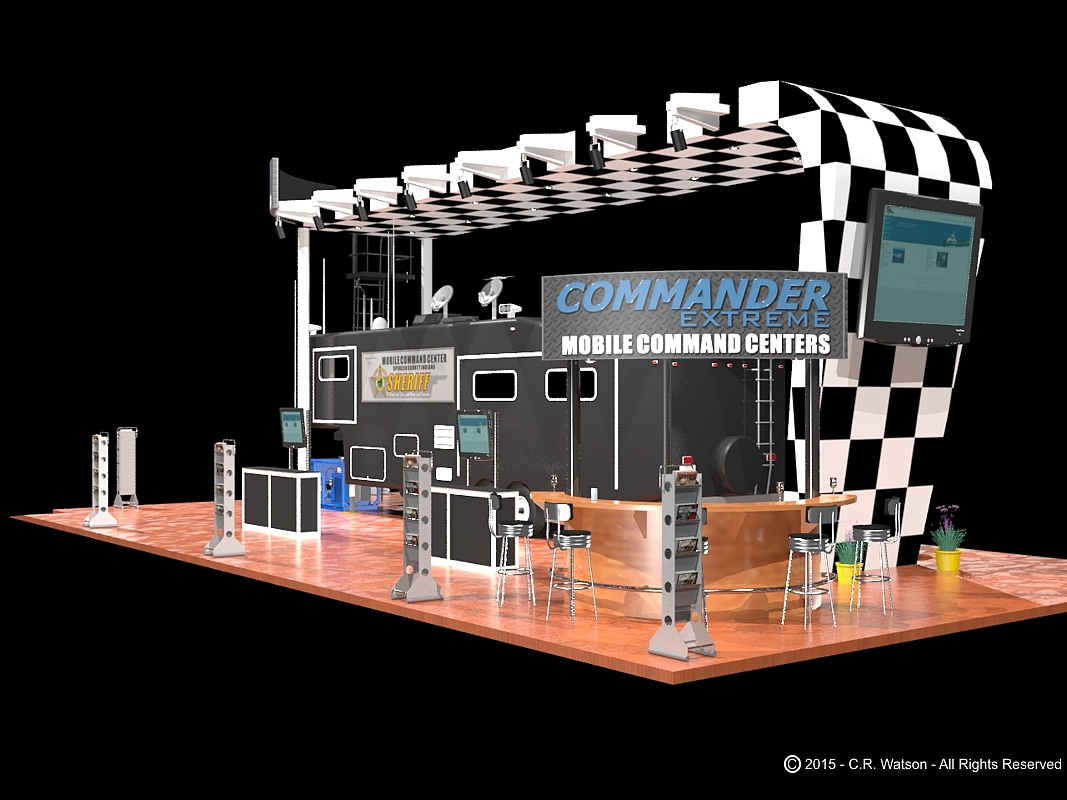
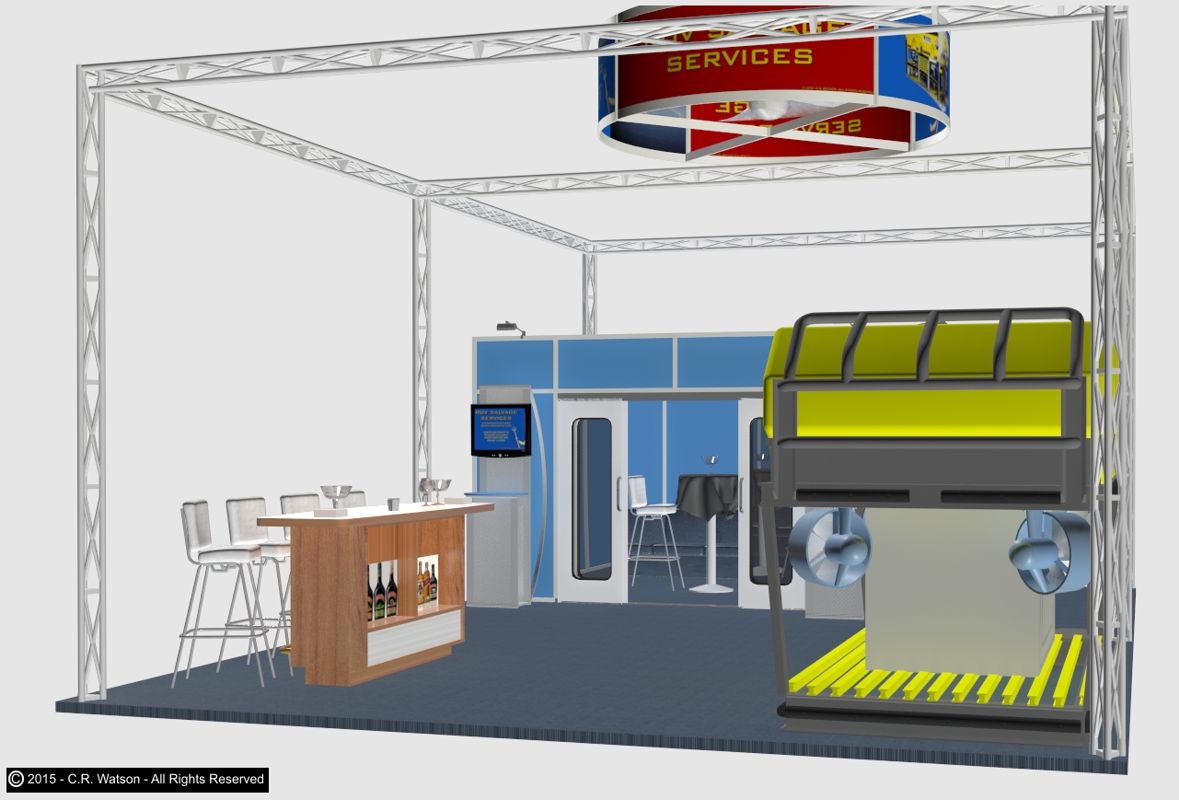
 Decision
to Exchange and Why Decision
to Exchange and Why
After adding the framework it is easy to
see that the round frame banner will be obscured as one approaches
the display. We want the name visible from at least one aisle
away so we swap the small round banner for a full surround basic
Sentra and Vinyl Text arrangement. (Still working on a limited
budget)
|